EDIUS’ interface
EDIUS Interface
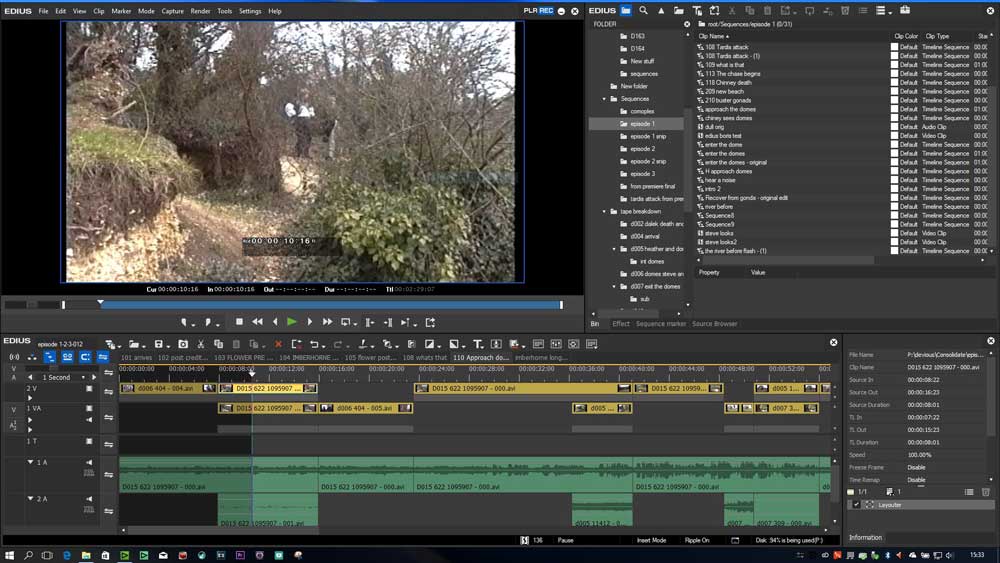
The main interface of EDIUS is similar to most editing programs. You have a PLAYER and RECORDER window, a project window where you can organise all your clips, different windows showing all your available effects, markers and information about the clips and a timeline where the video is laid out. You can have several sequences open at once and sequences can be put inside other sequences for multi-layered effects.
The timeline can have the audio either with the video clip or it can be separated into different tracks either just by dragging or using EDIUS’ track mapping. With the latter you can decide to split a stereo track onto two mono sound clips and route them to different tracks or add them as a stereo pair. If you have a multi-channel audio clip, such as one with 5.1 surround sound, each of the 6 channels can be split into separate files.
It has been designed to be tidy – when you capture there is no new window, the player window becomes the capture window. The trimming window simply takes over the main two windows when needed as does the multi-camera window. Premiere, for example, uses a new window for each of these and so you have many windows with which to content. EDIUS is simple.
Project settings
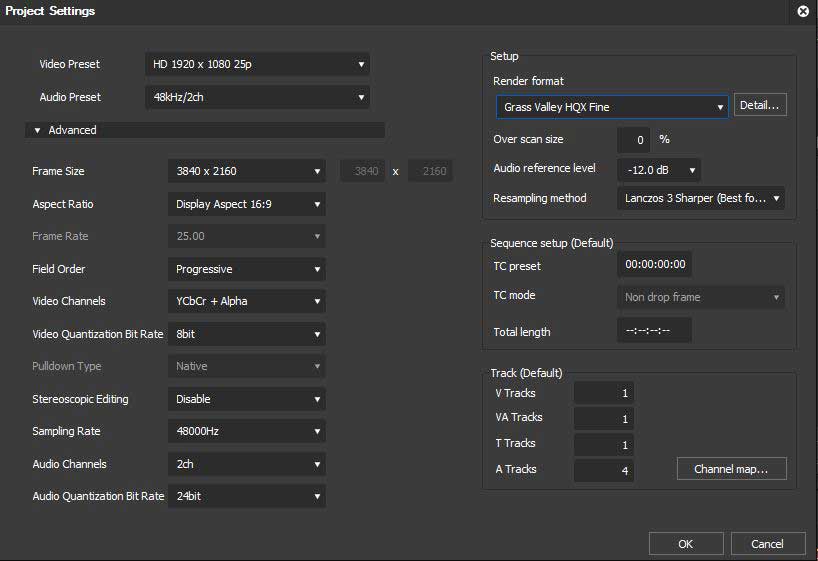
EDIUS has lots more possible project settings than older versions of EDIUS, and can have larger than HD project settings, all the way up to full 4K at 4096×2160. You can also define your own, even totally non-standard ones!
As you have so many options a wizard will guide you through setting up the standard settings when you install, but you can always customise and create new ones.
Grass Valley have added 10bit colour support to EDIUS. Most video formats (DV, DVD, AVCHD, HDV etc) work in 8 bit colour which produces excellent results. However, there are higher quality settings and one is to use 10 bit colour. Now EDIUS can work in 10 bit colour and Grass Valley have a version of their Canopus HQ codec, called HQX.
Most of EDIUS’ effects now work in 10 bit colour, with the arrival of EDIUS 7. In older versions like EDIUS 6 only the layout and mask tools were 10 bit but now important effects like colour correction also work in 10 bit.
Restore offline clips
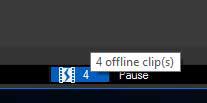
If clips are missing from the project you need a way to relink them. In EDIUS a small indicator appears at the bottom of the timeline telling you how many clips are missing from the currently open timelines You choose to sort out all off-line clips, just one ones used on timelines or only the clips used by the current timeline.
Project Window display
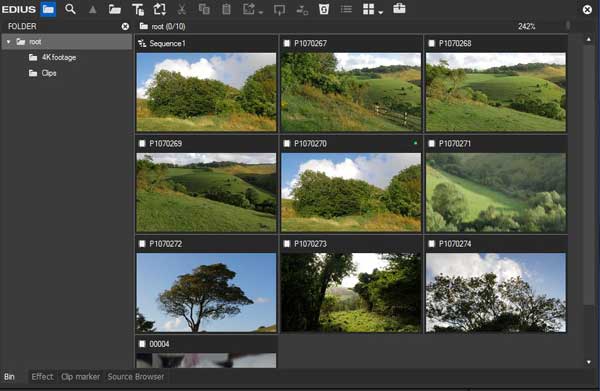
There are many ways to view clips in the bin – icons, icons with text, just text. and the one shown here – a simple thumbnail with no clutter of information around it.
Other information also appears on the clips – when loaded EDIUS sometimes performs some work in the background to make them more usable, like writing a picture of the sound so that you can zoom into the waveform display, or “indexing” complex compressed files to make them easier to use. All this happens in the background and generally does not affect your computer (when using a modern 64 bit machine). EDIUS can even copy clips from one location to another in the background and once finished copying will relink the files used to the new copies – all without any intervention from you.
Search the bin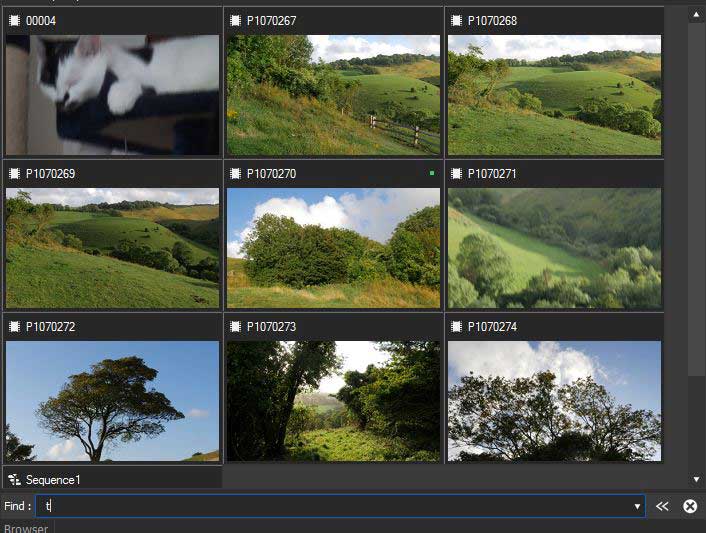
When you have lots of clips in a project sometimes you have problems finding the ones you want. EDIUS has two ways of searching for clips in the bin. You can use the Quick Search filter bar. Simply press the F3 key and enter a search term. The clips that match the search term will appear as you type. This feature can be filter by clip names, clip comments, file names or reel names. Plus, it keeps a history of previous search words, for you to quickly switch to.
You can also set up a search bin – which is constantly updated as you work. You specify the criterion – for example set up a bin which displays all the sequences in your project regardless of which bin they are stored – and any time you add a sequence this bin will be updated. You can also specify searches based on several criterion – for example all the clips with the word BRIGHTON on the name filmed in December 2011.
The source browser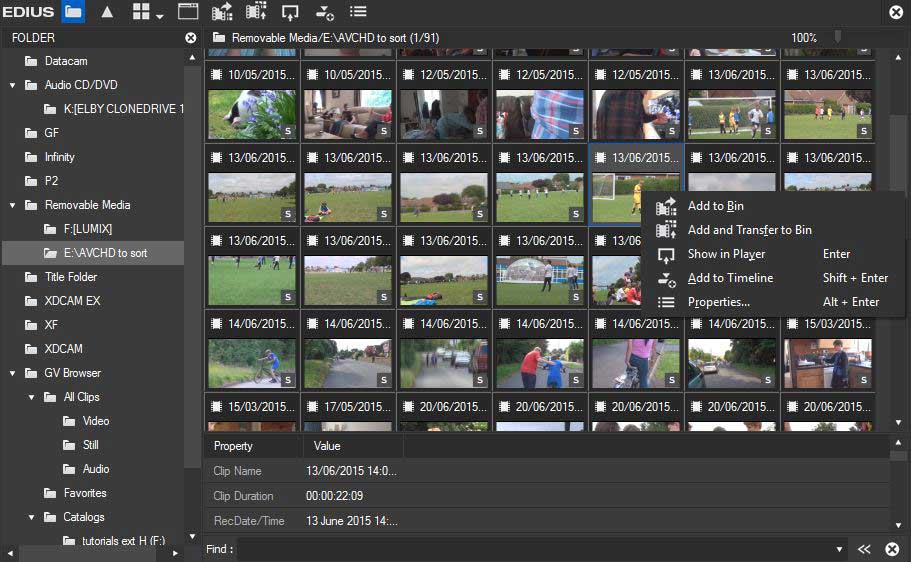
There are many ways to get footage into EDIUS. You can capture off tape, just drag clips into the bin, or use the traditional import file dialogue. When importing you have the option to leave the clips where they are or make a copy in the project directory. This means you can make sure you have one folder with all the media used in a project stored in it.
If bringing in card based or hard drive based footage you need to use EDIUS’ SOURCE BROWSER. The source browser will work for nearly every type of removable media – AVCHD on SD cards or hard drives, XDCAM, P2, Canon XF as well as CDs, DVDs and Blu-ray disc.
You connect the camera or plug in the card and it will appear in the list, with a series of thumbnails of your clips. Choose the ones you want and select “add and transfer to bin”. The footage is copied off your card and straight into the EDIUS project folder. It could not be easier. The copying is done in the background – you can even start editing straight away – using the clips off your cameras card – and when EDIUS has finished copying the footage it will simply swap to using the files it has copied. Obviously doing two things at once – copying footage and editing – will slow things down a little.
The source browser is also used to get footage off of audio CDs, video DVDs or video Blu-ray discs. Obviously this does not work for copy-protected discs.
Multiple sequences in a project
Break your edit up into smaller sections and then string the all together in one timeline, or have several copies of the same edit in one sequence. You can also put several clips into one sequence, drop it into a second and then apply effects to the whole sequence.
This is a great way to edit but the biggest problem with every editing program is that when you have loads of sequences together the timeline gets so complicated that the editing program struggles to keep up. How does Edius fare? Well in our tests extremely well.
Edius has always been great at managing large projects with lots of media and handles sequences in sequences the same way. We put about 60 sequences with multiple cuts in each into one main sequence and Edius remained responsive and stable as we opened lots at one, edited and move back and forth between them. Brilliant!
Metadata panel
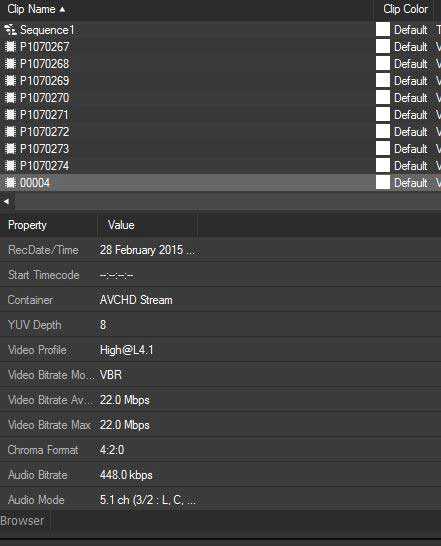
The project window has a “metadata” panel below the main project bin so you can see extra information about your clips easily. Here on this AVCHD file you can see the date and time of recording, file format etc but with other formats there can be all sorts of useful information.
Track patching
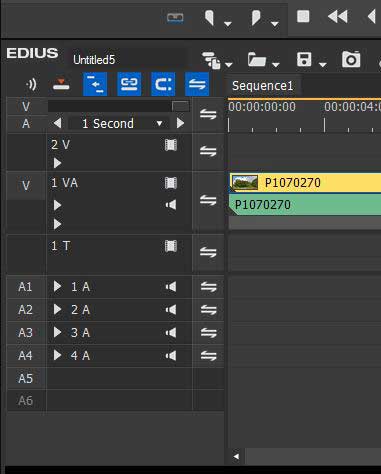
Track patching is how you decide where video and audio go when you either drag a clip to the timeline or add to the timeline using the keyboard. EDIUS also automatically does patching when you drag clips to the timeline. If you drag to a VA track the audio and video goes on this track. If, while dragging, you decide to put the video on a V track the audio automatically jumps down to the first available “audio only” track.
Alternatively you decide where the audio and video is going yourself. Down the side of the track header you have the “V” and “A1” and “A2” which you either drag up and down using the mouse or move using keyboard short cuts. As you can see in this screen shot my source has 6 channels of audio and I have chosen to add them to the timeline as six separate clips.
With old versions of EDIUS (pre version 6) we had “sync mode” on or off. This meant that when you inserted a clip either every clip on every track moved, or just the ones on the track on which you are inserting moved. Now we have sync locks per track – so you can decide which tracks stay in sync and which do not. All on is the same as sync mode on.
The “mode bar” above the zoom slider has several useful buttons. The first lets you set whether the audio comes in as a stereo pair or a series of mono tracks. The second switched EDIUS between insert and overwrite modes. In insert mode as you add clips to the timeline or trim them other clips move around. On overwrite mode nothing moves and it is overwritten if it is in the way. Both are extremely useful. Next we have a Ripple mode button which decides what happens to spaces as clips are trimmed – are they kept (ripple mode on) or do they disappear (ripple mode off). The fourth button is for clip linking. The audio and video of a clip is automatically linked so that when you select the video it automatically selects the audio as well. You can disable this and move audio and video separately. Theny we have a magnet icon which switches snapping on and off on the timeline. Finally we have a button which switches “rippling markers” on and off. All the buttons shown can be customised of course and have their own keyboard shortcuts.
You can select more than one track as well so when you perform a keyboard action it can be applied to many different tracks at once.
Great trimming options
EDIUS has lots of trimming options on the timeline and a dedicated trimming window. Unlike Adobe Premiere which loves 100s of windows, EDIUS simply replaces the main window with the trimming window when required. You can do all the variations of trim you need including slipping, slidding, roller and ripple. You can trim without using the trimming window on the timeline and EDIUS can either ripple all or some of your video tracks as needed or not as required.
There are keyboard short cuts added so you can slip, slide and perform other editing options just by holding a couple of keys. You can also easily copy a clip by holding the right keys (all this information will be included on our EDIUS tutorial disc)
Right click when dragging to the timeline
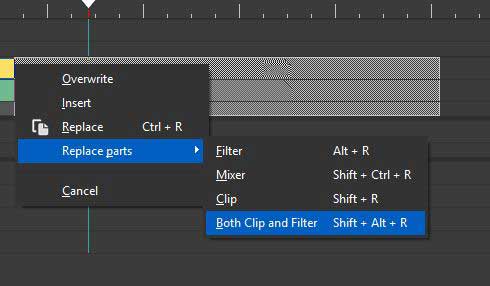
When you add a clip to the timeline by dragging you can right click on the place you want the clip to go and are presented with this screen letting you insert, overwrite or replace the clips.
Proxy mode
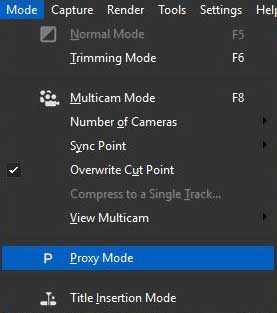
EDIUS has a proxy mode. You can get EDIUS to create low-res “proxy” versions of your clips. These are a lot smaller and easier to use than full res files. For example, a 1 hour standard definition DV file which is approx 13GB is about 500Mb as a proxy. You just select the clips in the bin and tell EDIUS to create your proxies, which it does in the background as you work.
These proxies have two purposes:1. When you are on the timeline and EDIUS cannot keep up with your effects you switch in to proxy mode and work at a lower resolution, which means it can play more layers of effects. It is as simple as pressing a button. Now EDIUS is so good at realtime performance even with hard-to-use AVCHD full HD footage, that you may wonder when you will use this. Since EDIUS can editing footage which is far bigger than HD these days you may use it when editing very high resolution footage, or may use it when you have many layers of effects on the timeline and EDIUS simply can’t keep up.
2. You can use proxies in conjunction with the “field editing” option to transfer a low resolution version to a different machine, for example a laptop, work on the project there, and then update the main editing machine with the full resolution files later.
Check in & check out
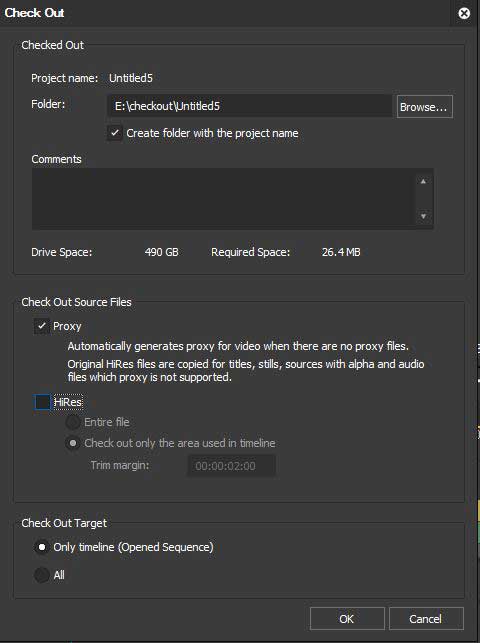
Check in and check out is used to copy your project to a different computer for offline editing choose “check out”. This dialogue appears and you choose what to copy across to the other computer – low res proxy files, hires files etc..
This then locks the project on the main computer and makes a new one with all the clips needed on the second PC. You then edit merrily away on the second PC, add in new media etc as needed. Then when you want to return the edit to the main machine you “check in”. This then updates the main computer, notices any files you have added and copies them across to the main computer and generally sorts everything out for you.When you check out you can either use low res proxies, so you can fit a lot of clips on a small hard drive, which also do not take too long to copy, or use full resolution files.This does not stop you copying and moving projects in the way you do with other programs; It is an extra tool to keep track of your projects as you move it around. I particularly like the way it notices if you have added any files and copies them back into the main project.
User profiles
In EDIUS you create a user account for each person using the computer and then any change they make to the layout, buttons, screen arrangement or keyboard shortcuts is saved. All you have to do is logon with your user account and EDIUS is instantly set up the way you like it. You can save the user account and move it between computers so each Edius can be configured exactly how you like it as well.
Full screen playback
 You can play an edit full screen – either on the main screen or any one of up to 10 monitors attached to your computer. In this example I have the standard two monitors on my PC and are running the edit full screen on the second.
This is not as good as using special hardware like a Blackmagic device, however, very useful if you do not have one of these cards or if you are editing a non-standard format the cards do not support. EDIUS full screen playback is actually very good and does not have some of the “tearing” that we normally get with most editing systems second screen playback. You access this either by selecting the option on the menu, assigning a keyboard short cut, or just double clicking in the playback window. You can also have this working as well as other output – so I have had DV out working at the same time as having full screen PC playback. Useful for checking out how the picture looks in both media.
Zebra display
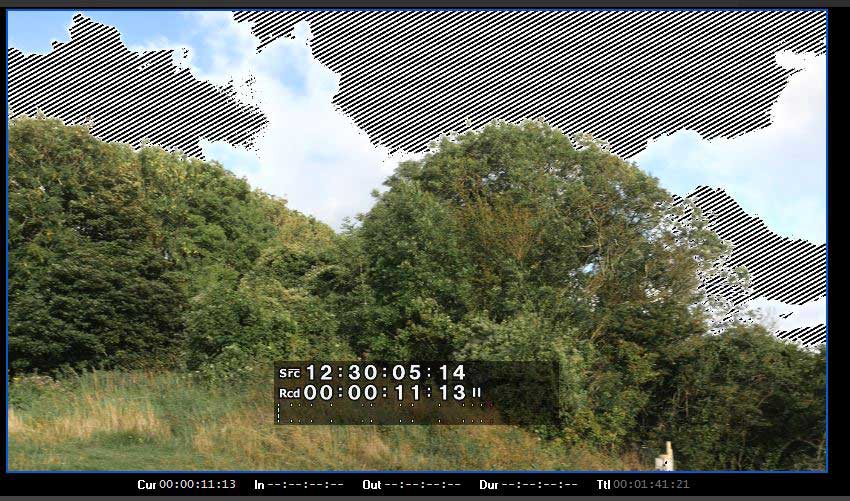
The Zebra display quickly shows you if areas of the image are over exposed. This being EDIUS you can customise the level at which an image will Zebra and even choose the colour that the zebra pattern appears.
Keyboard and display customisation
Everyone knows that if you can remember the keyboard short cuts in a program then you can edit fast. EDIUS had keyboard short cuts for nearly everything, and with version 4 these were rationalised as much as possible so they are really obvious – c for cut for example. However, you may want to set your own and so Edius has a great keyboard customisation option which pops up a picture of the keyboard and lets you drag commands on to it.
You can also customise the buttons on screen, the size, the text, the information that pops up in a tool tip when you move over a clip and more.
Multicamera
Take up to 16 cameras, sync them up and then watch all on screen at once together cut between them.
Edius’ mulitcamera works in a very simple way. Put the clips on the timeline one above the other. Sync them up either visually or using some queue point. Then enable multicamera. Depending on the setting – 3 cameras, 5, or 8, you will see the the source footage and the master shot on screen at the same time. Then just play the timeline and press on the picture (or use the keyboard) to cut between cameras. When you have finished you can still tweak each cut point, add camera angles etc to your hearts content. When you are finished you can “compress to a single track” which makes your edit into on video track with a bunch of cuts between them, and then if you like add transitions to the whole lot by just selecting the entire track and dragging the transition on to it.Simple to set up and use and one of the easiest multi cameras there is. Because of Edius’ realtime performance you will probably be able to play all 16 cameras at once as well, even with HD on a good computer!
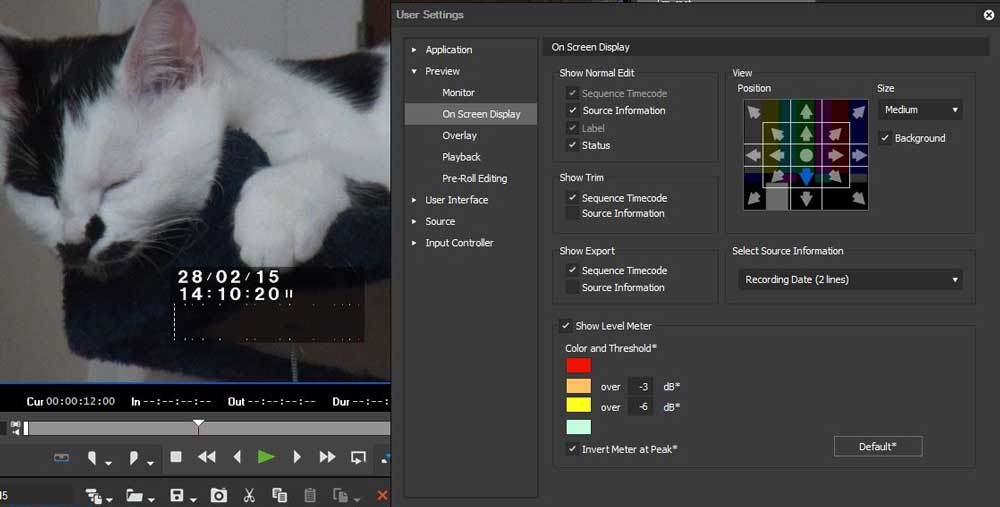
Date and time information can be printed on screen
EDIUS is one of the few programs that lets you see the date and time information stored in the video clip. DV and the new HD formats store a lot of information in the files and yet most programs do not let you see this information. EDIUS not only puts this information in the bin but it can be printed on the output screen, and this can even be burnt into a final file or tape, just like the timecode information.
This is really useful – if you are making a home video you can print on screen the date and time an event happened; for surveillance videos you can have the exact date and time printed on screen at all times, and if you are matching up clips from different sources (or even from a video tape and a digital audio source) you may not have matching timecode but you can at least synchronize the clocks on different filming devices so that you can get a reasonably accurate match of which take is which when editing.
Time remapping
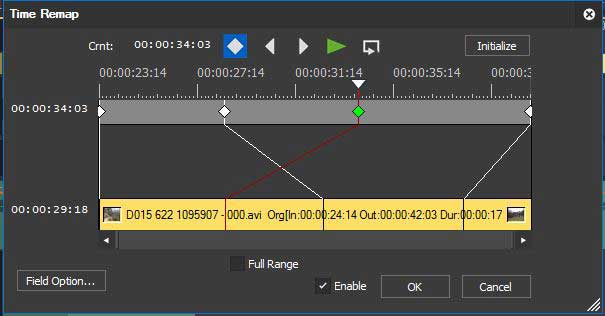 EDIUS has great slow motion – but apart form just getting a clip to play at 30% or 25% you can also ramp the speed up and down. Start at 100%, slow it down to 25%, then run it backwards, then forwards at 300% and generally play around to your hearts content. Apart from being fun for all the family this effect is useful – you only have to watch a modern TV drama to see it in use all the time.
Most programs now do this but the EDIUS version is easy to understand and is also realtime, even with HD footage. Slow motion is a moving effect and to see the results properly you need to see it moving. With other programs you will get a preview but not a full speed effect, which means less time rendering and more time working.
The time remapping has also had a welcome addition. When you perform a time remap – slowing sections of the clip down, the clip may get longer, but its duration on the timeline stays the same. This means bits of the clip are no longer seen and you would have to pop out of time remap, make the clip longer then pop back in.
Now you just tick “full range” and you can see the entire clip and re-organise the footage as much as you like. Once finished you then drag out the clip to be a bit longer on the timeline.
You can also set the field and blending options when in this effect. Nice.
Titling options for EDIUS
EDIUS has its own competent titling program called QuickTitler. This will do static, rolling and crawling titles. If you want fully animated titles then there are several other options.
Videostar VisTitle for EDIUS
VisTitle is an extremely powerful new titling program for EDIUS that can do animated 2D and 3D titles and a lot more besides.
ProDad HeroGlyph for EDIUS
HeroGlyph can do character-by-character animated titles as well as many other things including video walls and hand drawn paths (either to create a hand-drawn title or to make an object, like a car, follow a path on a map). It is very easy to use once you get past the non-standard interface – in fact all you really need to do is follow the instructions written on screen! Animated paths are not as customisable as with VisTitle although you have a huge variety.
NewBlueFX Titler Pro
New Blue Titler Pro is an easy-to-use 2D and 3D titling program. Vistitle does a little more but the NewBlue one has a lot of options especially if you have other NewBlue filters installed.
Title Motion Pro
Title Motion Pro used to come with EDIUS but is no longer made and is not supported in version of EDIUS after 6.5.
Other Plug-ins
- Boris FX and Red plug into Edius to allow you to do more complex effects and compositing.
- ProDad’s range of effects also plug-in to EDIUS and add a large range of excellent and useful features. Adorage is a range of fancy transitions which ships with some versions of EDIUS.
Audio editing
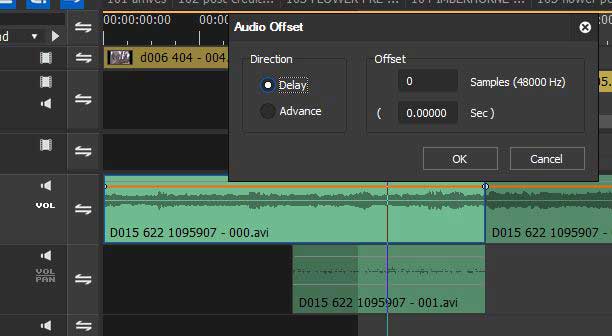
EDIUS can edit audio down the the frame level. You can easily split the audio into left and right channels, pan the audio left to right, and ramp the level up and down.
It can also handle audio with up to 16 audio tracks which you can add to the timeline en-masse. EDIUS does not do surround sound mixing, however, if you set up the project correctly and already have a surround sound mix, EDIUS can write this to disc or make a Dolby Digital file for use else where (information on how to do this is included in our tutorial discs) Adobe Premiere Pro has more advanced sound editing, as does Sony Vegas, with both editing down to the sample level, with surround sound, and with tracks that can be routed to different buses and have effects applied on a track or clip level. EDIUS sound editing is comparable to Avid Media Composer, Apple Final Cut Pro or Adobe Premiere 6 (the latter is no longer available, having been replaced by Premiere Pro a few years ago, but it may help you to gauge the level of EDIUS’ audio editing). EDIUS also has a good voice over tool, which lets you play the timeline and record to a track whilst doing so, and support for VST plug-ins which means there is a huge range of possible add-on effects available.
EDIUS’ Audio mixer
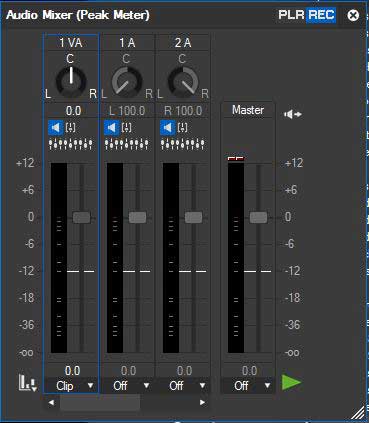
The EDIUS audio mixer will either adjust the overall level of the audio on a track or on a clip basis. You can also play the timeline and record the mix live as you do so.
If you set the mixer to “clip” you can use the slide to change the overall volume of the clip under the playhead in EDIUS. On the audio clip there is a “rubber band” which displays the audio level and which can be keyframed to make an audio clip- fade in or fade out. To get to this control you need to open the audio track and activate the “mix” line and then start adding points. Using the audio mixer you can change this “rubber band” without even opening the audio track. The audio mixer adjusts the volume of the whole clip. It can be used to add a fade and keyframes but only when playing the timeline line.
EDIUS Pro and EDIUS Workgroup
The audio mixer is one area where there is a difference between EDIUS Pro and EDIUS Workgroup. The Pro version can do what we have outlined above. The Workgroup version adds extra functionality in that you can decide how the audio is heard through your speakers.#
Imagine you have a surround sound track with 6 audio tracks : Front left, front right, centre, sub woofer, back left and back right, but you are listening to the clip through Stereo speakers. The speakers will play the front left and front right and ignore the rest. With EDIUS Pro there is no option to fix this. With EDIUS Workgroup you can tell EDIUS which tracks go to which speakers – downmix everything to a Stereo file, for example.
In Pro you can still use all the audio tracks, but you can’t hear them all in the player. In Workgroup you can hear all your tracks. This is extremely useful as many cameras film, not just in surround sound, but some times with up to 16 channels.
Audio Normalise
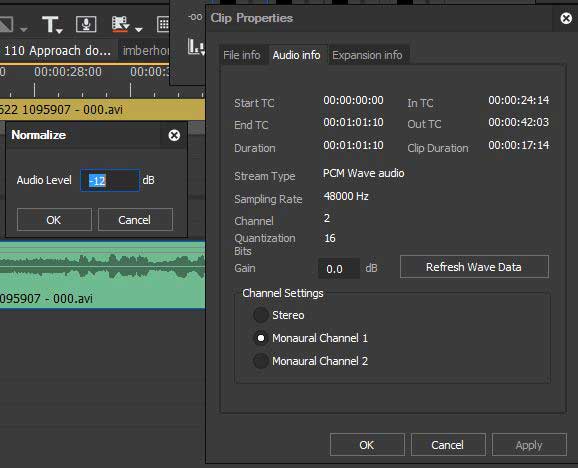
You can select a number of clips, either in the bin or on the timeline, and tell EDIUS to “normalise” the volume to a level you specify. This looks at all the clips and increases the clip volume to the maximum loudness, while not making it so loud that it distorts. Just like a similar feature in Premiere Pro, if there is one loud spike in the clip then that will govern how loud the clip becomes. It is a tremendously useful feature to increase the volume of the audio of all you clips with just a couple of clicks. Any changes can always be modified on a clip by clip bases as well.
Other items
 Clip & timeline markers
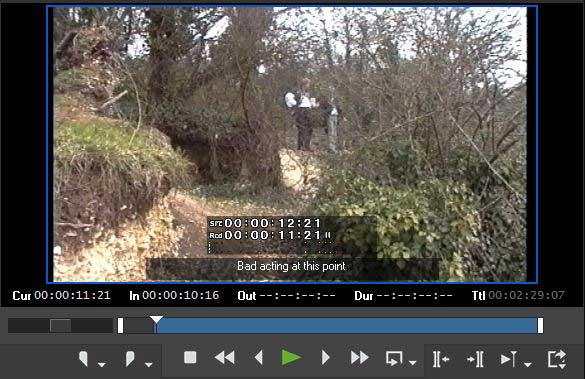
You can apply markers with comments to both the timeline and the clip. You can add markers while capturing and if you capture into Grass Valley HQ format these are saved in the file, so available in any project. The comments you add appear as an overlay on the screen when you go over the marker, in the same way as they would in Avid Media Composer or Final Cut Pro.
Clip marker support also includes recognition of P2 Shot Marker and XDCAM Essence Marker data.With EDIUS 7.4 and later versions you can choose to ripple markers on the timeline when you move clips or add clips.Markers also “double up” as chapter points for DVD and Blu-ray discs. You can add these as you edit or when you have finished. Now that you can decide whether markers move when clips are added or removed you can “lock” your marker to a particular clip and when you edit the DVD chapter moves with it. Very handy.You can import and export both clip and timeline markers. The file you import/export is a standard CSV file which can be altered in any decent spreadsheet program or even in Notepad. This makes it easy to get clip and other information imported and exported from EDIUS. Remarkably many other professional programs cannot do this – Premiere Pro cannot import markers unless they were created with their own program, Prelude, and Avid Media Composer can only import markers to the timeline and not on to the clip.
Freeze Frame
This option lets you set a simple freeze frame effect for any clip on the timeline. Simply position the edit cursor where you’d like your video clip to ‘pause’ and then choose this option. The remainder of the clip will be frozen in time, until it either reaches the end of the clip, or you set a new ‘unfreeze’ position.
ALE and FCL Batch Capture File Support
You can import Avid .ALE and Final Cut Pro .FCL batch capture log files into EDIUS to form a batch capture list.
Import Final Cut Pro XML files
This lets you import Final Cut Pro 7 and earlier project files into EDIUS. Adobe Premiere Pro also supports XML files and this has proved a good way top move an edit between Premiere Pro CC and EDIUS. XML lists are good for cuts and clip positions and some effects, bit not everything. Just like all project exchange formats (EDL AAF etc..) they do not transfer everything and some times they do not work. This is the same with all programs. EDIUS can import XML files but cannot export them.

